Der erweiterte Schreibfilter wird auch mit Windows Embedded Standard 7 ausgeliefert. Er enthält jedoch nicht den aus früheren Versionen von Embedded bekannten Disk-Modus. Der Diskettenmodus erlaubte es, alle Änderungen auf einer separaten Festplatte zu speichern.
Es gibt einen alternativen Ansatz, um ein ähnliches Szenario wie den EWFs Disk Mode zu schaffen - Sie können VHDs verwenden.
Da Windows 7 und auch WES7 das Booten von VHDs (Virtual Hard Disks) unterstützen, können Sie die Funktion der differenziellen VHD nutzen.
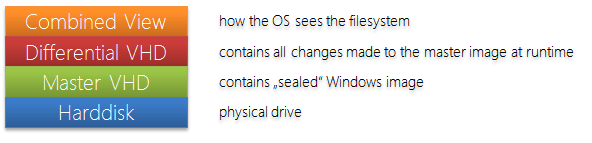
Diese Funktion ermöglicht es Ihnen, eine Master-VHD-Datei zu erstellen, die das Betriebssystem in dem Zustand enthält, in dem es bleiben soll, und eine differentielle VHD, die alle Änderungen speichert, die während der Laufzeit am Master-Image vorgenommen werden.
Sie können zum Beispiel Ihre Master-VHD-Datei auf einer Compact Flash und die Differenzdatei auf einer Festplatte speichern, um alle Schreibvorgänge von den Flash-Medien wegzuleiten.
Eine Funktion von EWF ist es, alle Änderungen am Image bei jedem Neustart zu verwerfen.
Die Lösung hierfür ist, eine neue differentielle VHD-Datei mit dem Master als Elternteil zu erstellen und die neue VHD als Standard-Boot-Eintrag zu verwenden.
Nach einem Neustart befindet sich das System wieder in seinem ursprünglichen Zustand.
Differential VHD zurücksetzen
Um diesen Prozess zu automatisieren, können Sie die folgende Batch-Datei verwenden. Bitte passen Sie die Pfade im Abschnitt "Variablen" an Ihren VHD-Speicherort an. Die Installation der Batchdatei finden Sie weiter unten.
Wie es funktioniert
Das System arbeitet mit 2 differentiellen VHD-Dateien, die bei jedem Bootvorgang ausgetauscht werden.
Bei jedem Start prüft die Batchdatei, welche differentielle VHD aktiv ist.
Es löscht dann die nicht aktive differentielle VHD und erstellt die nicht aktive VHD neu.
Dadurch werden alle vorherigen Änderungen rückgängig gemacht. Dann setzt die Batchdatei die neue nicht-aktive VHD als neues Standard-Bootgerät.
Beim nächsten Start wird das System von der neu erstellten VHD booten.
Batch-Datei
@echo aus
echo VHD Diff Resetter erstellt von Wolfgang UngerREM #########################
REM Variablen
REM #########################
set VHD_Drive=D:
set VHD_Parent=wes7.vhd
set VHD_DiffFile1=wes7diff1.vhd
set VHD_DiffFile2=wes7diff2.vhdset TempFile=D:\diskpart.txt
REM #########################REM Versuchen Sie, die zweite Diff-Datei zu löschen. Bei Erfolg wird Image 1 gebootet.
del %VHD_Drive%\%VHD_DiffFile2%
wenn vorhanden "%VHD_Drive%\%VHD_DiffFile2%" goto File2del %VHD_Drive%\%VHD_DiffFile2%
echo create vdisk file=%VHD_Drive%\%VHD_DiffFile2% parent=%VHD_Drive%\%VHD_Parent% > %TempFile%
echo exit >> %TempFile%diskpart /s %TempFile%
bcdedit /set {aktuelles} Gerät vhd=
[%VHD_Drive%]\%VHD_DiffFile2%
bcdedit /set {aktuell} osdevice vhd=[%VHD_Drive%]\%VHD_DiffFile2%GOTO Erledigt
:Datei2del %VHD_Drive%\%VHD_DiffFile1%
echo create vdisk file=%VHD_Drive%\%VHD_DiffFile1% parent=%VHD_Drive%\%VHD_Parent% > %TempFile%
echo exit >> %TempFile%diskpart /s %TempFile%
bcdedit /set {aktuell} device vhd=[%VHD_Drive%]\%VHD_DiffFile1%
bcdedit /set {aktuell} osdevice vhd=[%VHD_Drive%]\%VHD_DiffFile1%:Erledigt
del %TempFile%
echo Erledigt.
Einrichtung
- Installieren Sie Windows Embedded Standard 7 auf eine VHD. Bitte schauen Sie hier nach einer Anleitung.
- Booten Sie das Image.
- Speichern Sie die Batchdatei von oben in das Bild.
- Taskplaner öffnen
- Klicken Sie auf "Aufgabe erstellen...".
- Geben Sie einen Namen für die Aufgabe ein und aktivieren Sie "Mit höchsten Rechten ausführen".
- Gehen Sie auf die Registerkarte "Auslöser" und klicken Sie auf "Neu".
- Wählen Sie "Beim Start" aus der Dropdown-Liste "Aufgabe starten" und klicken Sie auf "OK".
- Gehen Sie auf die Registerkarte "Aktionen" und klicken Sie auf "Neu".
- Suchen Sie die Batch-Datei und klicken Sie auf OK
- Klicken Sie auf OK, um die Aufgabe zu speichern.
- Führen Sie die Batch-Datei einmal aus und starten Sie neu
Verwendungsszenarien
Diese Lösung kann hilfreich sein, wenn
- Verwendung eines Flash-Laufwerks, das das Master-Image enthält; alle Änderungen sollten auf einer Festplatte gespeichert werden
- die Änderungen sollen auch nach einem Neustart erhalten bleiben (dazu die Aufgabe nicht erstellen und die Batch-Datei nur bei Bedarf ausführen)
- Sie wollen weder EWF noch FBWF verwenden
- usw.